The Elusive Boot Fit
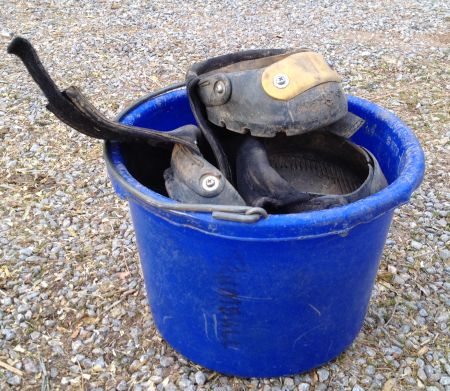
At last it was time to fit Roo’s Gloves. Out came his boot bucket and the rubber mallet.
When I first converted Roo to barefoot nearly three years ago, he wore a #0.5 on one front foot (the low heel side), an #0 on the other (the high heel side), and #00.5s on the back. More recently, after languishing in the paddock doing nothing for the last couple of years, his feet were now closer to both being #0.5 in the front, and #0s in back.
Before going further, I held the bottom of an #0.5 boot against the underside of his foot. I position the back of the boot level with his heels and then peer all around. By doing this “eyeball fit”, you can see if there is any flaring that’s likely to cause problems, if the toes are too long to get the hoof snugly into the front of the boot, and generally if you’re even close to having the boot fit.
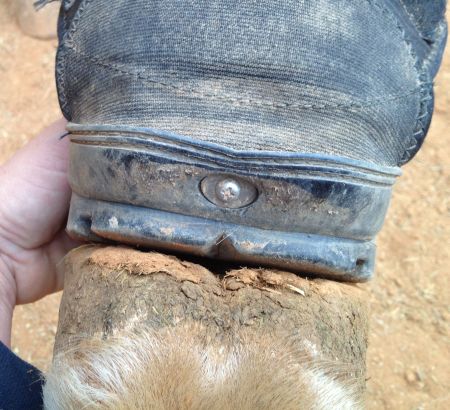
Side-to-side fit looks pretty good – very snug.
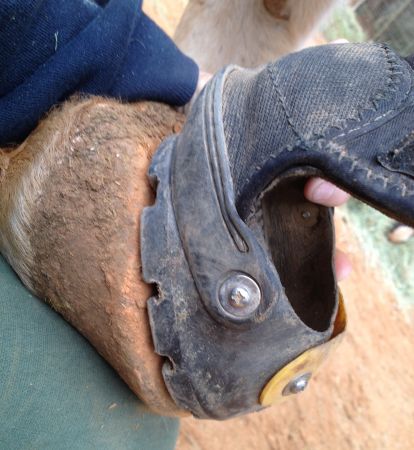
But looking further forward, I can see I’m going to have to work to get this boot on. It could be that if I re-evaluate his trim, I may find that his toe could be shorter.
In Roo’s case I could tell that it was “sorta” going to work, but it was going to be tight – and even tighter given that this pair of #0.5 Gloves had Power Straps attached to them.
Because I wanted my friend to get the idea of how to put the boots on, and because I knew this one was going to be a real struggle, I opted to put on a #1 Glove first, just to ease her into the whole enterprise.
Gaiter Flipping
First I showed her how to flip down the gaiter as far as it would go. New gaiters, being stiff, tend to not flip down quite as far as they can, resulting in a “poofy area” closest to the boot. If you’re not careful this bulge gets pushed down into the boot as you’re trying to fit it and stops the boot going on properly. However, as the boot gets worn in, the gaiter will flip down much more easily and this will be less of a problem.
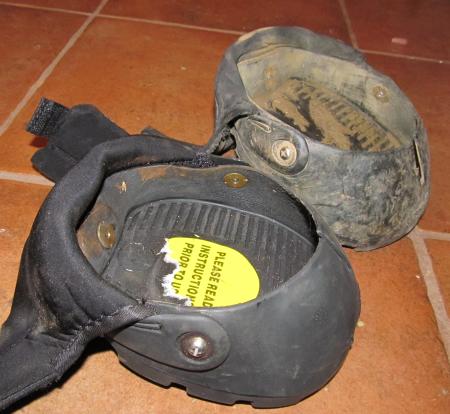
A new boot gaiter is “poofier”, so doesn’t fold back as flat as the gaiter on the older boot shown behind. This “poofiness” tends to get rolled down into the back of the boot when you’re trying to push it on the foot. Eventually the gaiter will behave itself and make boot application much easier.
To begin with, even the #1 boot wouldn’t go on. Part of the problem was the aforementioned bulge which immediately disappeared down the back of the boot, necessitating its removal, re-stretching down of the gaiter, and starting again. It’s worth mentioning that if we had been fitting the #0.5 boot, this would have been less of a problem because there wouldn’t have been extra room in the rear of the boot for the bulge to fit down where it didn’t belong.
Grungy Hoofwall
After some wiggling and puffing, I realized another problem was that Roo’s hoof had a little dried lumpy mud glued to it which I cleaned off using the edge of the rasp. Our area is blessed with clay soil that sets like concrete. This may work fine as hoof-expander when dry, but as soon as we cross a creek, it’ll turn into slime and have the effect of greasing the hoof. Not great.
Rubber Mallet Usage
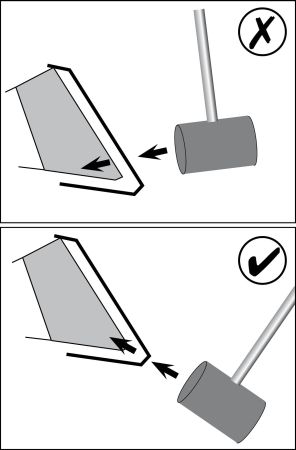
The boot (especially a new, unflexible boot like the one we were using) tends to get jammed on the quarters, so you have to wiggle it side to side to ease it over this wide part of the foot. Once you’re close to getting it on but it still isn’t quite going on all the way, I had my friend give it a couple of whacks to the toe and then a couple to the heels to seat the boot.
To get best results when you hit the toe, angle your rubber mallet so that you’re pushing the boot towards the toe, not towards the underside of the foot.
Fast-Fingered Gaiter Flipping
As you let the foot down, it’s best to flip the gaiter up before it gets to the ground. If you don’t, the horse will always stand on the gaiter and the back of the gaiter will always fill up with small rocks/mud/twigs, even when the horse is standing on a completely clean surface. It is written.
Feeling the Toe
Once the boot is on (or you think it is), you can push on the bottom-front of the boot to see if there’s any space behind it. If there is, your boot is not on all the way and usually a couple of whacks with the mallet, or a few steps trotting the horse will seat it properly.
Evaluating the Fit
As this point you evaluate the fit again. Is the V at the front stretched slightly, or is it loose? In a perfect world, that V should be stretched slightly, showing that the whole of the boot wall is tightly hugging the hoof wall. In reality, if you have a horse with flared walls (common when you don’t trim them as often as you should… <inspect fingernails>) or more particularly, a flared toe, you may find that the lower part of the boot is fitting very tightly, but the upper part is gapping somewhat (this is a problem I fight constantly with Uno’s over-enthusiastic toes if I don’t stay on top of them). Sometimes the addition of a Power Strap can help this problem. And sometimes it’ll make it so that it’s impossible to get the stupid boot on, especially if you’re using a brand new one, so you might need to wait a few uses before fitting the Power Strap.
Either way, rest assured that the more you do this, the easier it’ll get. Not only will the boots become more flexible with use, your boot-applying technique will also improve and you’ll struggle less. The use of the rubber mallet may become a thing of the past as your boots stretch to fit your horse’s feet better, and you get a better shape to his foot as his transition continues.
With a #1 boot on Roo’s foot, my friend was quite pleased with her handiwork. She felt that the boot was a good fit. On the other hand, I wasn’t quite so sure. Knowing that in the past Roo wore a #0.5 on this foot, I couldn’t tell if the #1 Glove seemed to be working because because I’d allowed his feet to grow too long or if his feet had actually expanded in stature. My gut feeling was that although the #1 boot would probably stay on for most riding, if we got into an extreme situation (foot twisting, rough terrain, steep hills), the boot would probably come off.
Pulling out the #0.5 Glove (with Power Strap), I worked hard and managed to smoosh it onto his foot. As anticipated, it was a very tight fit and would have been much easier without the Power Strap “help”. So my choice for him would be to keep him in an 0.5 (and remove the Power Strap).
And this is where a fit kit is worth its weight. You may find that you put a #1 boot on your horse’s foot and are very satisfied with the results and think that you have the best fit possible. But if you then put on a size smaller, an #0.5, you may realize that that is the perfect fit.
Similarly, by holding each size of shell against the bottom of the foot, you can readily see how the boot is going to fit.
If you really fight to get a boot on, yet the fit isn’t great, could it be that the horse’s toes are too long? This is something I struggled with for many weeks with Roo’s back feet in the early days. With what I felt were ‘reasonable-length’ toes, his rear boots constantly came off on steep hills. By holding the next size smaller boot against the bottom of his foot, I was able to see how much toe needed to come off to get a really good fit – and also able to see that the amount of toe that needed to come off wasn’t much. I shortened his toes and the boot losses stopped.
Listening to people talk about their boot losses despite “a good fit”, I often wonder how good their fit really is and if by trying a smaller boot and/or with a small adjustment to their trimming, they’d be able to get a “perfect fit”.
(…or alternatively it could be that they have horses who move like gumby and deliberately twist off their boots just to annoy them.)
—
Lucy Chaplin Trumbull
Sierra Foothills, California


