


Submitted by Pete Ramey
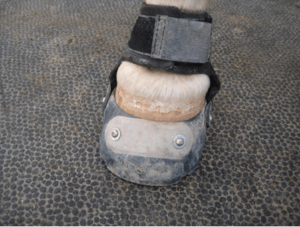
Easyboot Glove hoof boots with optional Power Straps added to the top of the lower shell.
Since they were only prototypes in 2008, the Easyboot Gloves and Glove Glue-On Shells from EasyCare Inc. have been my primary tools for hoof protection. There are many great boots and gluing options out there and I have tried a majority of them but these have remained my favorites.
Easyboot Gloves
These boots are light, compact and durable; but the reason I am so fond of them is that I can modify them in so many ways to suit individual hooves. This is particularly important with flared or rotated hoof capsules or hooves with low heel/long toe syndrome. The toe of the boot can be heat-fitted to expand, allowing the breakover to be placed correctly – critical to correct movement and thus rehabilitation of these hooves.
Heat-fitting is useful for more routine fitting on “normal” hooves, as well. The Glove is so light, durable and compact partially because it does not rely on buckles, straps and overlapping layers of materials to keep it on. Instead, it relies on perfect fit. If the boot is touching the foot everywhere, with no excessively tight areas and no areas with air space between the foot and the boot, it will perform like no other. But – and this is a big but – if the boot is tight in some areas and has air space in others, it may be one of the least reliable boots on the market. Fit is everything with this model, and if the foot is changing, the boot will have to change along the way as well.
That means that this boot is not for everyone and not for every hoof; however a well-fit Glove is the highest-performance option, so each owner must decide whether to go this route. I suppose this is similar to a racing engine that must be pulled apart and rebuilt after every race. Is this a good engine? It depends on your perspective.
This is an easy choice for horse owners who are lucky enough to have a hoof professional who does all this modification for them. But for horse owners “on their own,” the Easyboot Glove may not be the best boot choice.
Heat-Fitting
I use the Digital Heat Gun from Ace Hardware that reaches 1100° (Fahrenheit) although any other brand will work, as long as it reaches this temp. Place the boot (or shell) on the foot and then palpate the boot walls. You will usually find that some areas of the boot are tight against the foot, and some are loose – you can press inward to close the air space inside. Mark any areas that are tight with a Sharpie. When heat fitting, you will generally be moving the foot forward into tight areas until the loose areas become tight.
As you close these loose areas, you will simultaneously be optimizing breakover and placing the heels in the perfect spot to be snug (but not overly tight) and sitting all the way down on the boot floor (not standing on the heel portion of the shell or the gaiter).
Remove the boot from the horse for the heating process, and be careful to direct the heat away from the gaiters (and your hands). Only the lower shell is heated. You need to heat the boot gradually, so it heats all the way through. The timing varies daily with the power source, heat gun, ambient temperature, and the temperature the boots endured in the back of your truck the previous night. So each time I heat boots, I must determine a new timing. I do this by seeing how long it takes the area I’m heating to develop a sheen.
On the outside of the boot, hold the heat gun parallel to, and ¾” away from the surface, moving the heat gun small in rapid circles to distribute heat. As soon as you see a slight sheen appear on the surface, move the heat quickly to another area. Keep the heat focused only on the tight areas you previously marked, trying to avoid heating areas that were already loose on the hoof wall. Once you have brought a slight sheen to the desired areas on the outside walls of the boot, switch to the inside of the boot. You will not be able to focus heat as accurately or see the sheen on the inside, but instead, apply heat for the same amount of time as you did on the outside. Repeat one more time inside and out for the same amount of time as it took to develop the sheen in the first lap.
Caution: In used boots, you will not see the sheen develop – the ground-in dirt hides the sheen until the boot is over-heated. Learn today’s timing on a new boot before trying to heat up a used one.
If, at any point in the heating process, you see tiny bubbles emerge on the surface, move on from that spot and don’t return – that area is slightly over-heated (but may still need more heat from the inside of the boot).
After this process is complete, move quickly to the horse and put the boot on. You may need a rubber mallet to drive the boot back far enough. When the heels are in the perfect spot in the boot, put the foot down, let the boot cool for two minutes, and evaluate your fit.
Evaluating Boot Fit
The key to Easyboot Glove success is at the heels. If the heels are too tight, the boot will be constantly trying to “squirt off” the foot (plus heel rubbing is likely, as is gaiter failure). If a mallet is required to put the boot on, the heels are probably too tight. The boot should slide on readily in hand.
If the heels are too loose, the foot can twist in the boot. If it can twist with hand pressure, it will twist when you ride. So to combine these two extremes, the perfectly fitted Glove will slide right into place with firm hand pressure (no percussion), but then “suck” into place with no turning of the boot on the foot.
Secondary to heel fit is the percentage of boot wall touching the foot. Ideally, the boot will be touching the hoof wall everywhere with no air spaces. But this perfection is sometimes impossible to achieve – particularly with wide feet or feet with large quarter flares. The boot can perform well with about 30% airspace, but always strive for “the best you can get.” At this point, I often reheat small, tight areas to close more air spaces, particularly at quarter flares.
Hind Feet
I fit hind feet the same way, but it usually looks very different. Hind feet tend to be more pointed than the rounder front feet. The Gloves (and all other hoof boots) were designed to fit the front feet. This is why hind boot fit issues are so common, and this is where the Gloves can really shine. I generally pick a hind boot size by its width.
This usually means the foot is way too long for the selected size. I then heat the center of the boot toe, allowing the horse’s more pointed hind toe to hang over the front of the boot, much like a laminitis case. This, of course, locks the foot in place within the boot, preventing the twisting so common with hind boots.
Boot Sizing
Sometimes, by the time you get the toe area fitted, the heels have become too loose. This boot will not function well because the heel fit is the most important aspect. You simply need to go down a size (or two) and start over. This is not a big deal for professionals, who can simply sell the other boot to someone else who needs that size, but can be really bad news to a horse owner who has one horse and one set of Gloves. With experience, you can learn to prevent this (usually) by simply thinking things through before you heat. If, during the initial assessment, I see that I have significant changes that need to occur at the toe, but my heels already fit nicely, I automatically know I need to start with a smaller size.
It usually works well to size the boot for the width the foot would be if there were no quarter flares, and then heat-fit to accommodate toe length and any wall flares. At best, with distorted feet, this will take some experimentation, so it is always best to have several different sizes around to simply try on.
One Foot, One Boot
Like your own shoes, horse boots adapt to the foot with use. For best results and performance, designate one boot to one foot (I “earmark” them with nippers and/or a hole punch, as writing on them doesn’t last). While this will help with the performance of any boot model, it is particularly critical with the Gloves. If you need to share boots between horses, I recommend you choose a different model – one with buckles, straps and overlapping layers of materials.
Other Glove Modifications
Insoles
The most common modification I make is the addition of padded insoles to the boots. This puts the sole, bars and frog to work, thus relieving strain on the laminae and provides a cushier ride to the solar corium. A weakness of the Gloves (vs. some other models) is that they generally won’t accommodate pads thicker than 3/8-inch. When I need thicker padding for extreme rehab cases, I use a different model.
But for most horses, 1/4”-3/8-inch pads are all we need, and these work well in the Gloves. A wide array of pad choices are available – your imagination is the limit – but the best pad is the one that makes the horse feel the best. Particularly with lameness cases of any kind, it is wise to experiment with multiple pad choices and pick the one that yields the best movement of the horse.
I am a big fan of the EasyCare Comfort Pads (as I should be, since I originally picked out the materials). They come in two thicknesses and three densities that cover most needs. It can be a big money-saver, though, to find large quantities of raw foam/rubber from other sources. Horses with thin or otherwise painful soles tend to choose this type of padding over other options.
Another favorite of mine is synthetic felt in 1/4″ or 3/8” thickness (thanks Sossity and Mario of Wild Hearts Hoof Care). Horses with caudal foot pain tend to prefer these. They are also better for moisture management, so I really like them for boot turnout and in glue-on shells. Sourcing the material has been a bit of a problem. It is readily available online but seems extraordinarily expensive. So far, I have continually found new saddle pads and liners at clearance sales for my own use, and I am always sticking my nose into clients’ tack rooms looking for a deal on an unwanted felt saddle pad. I have also found the thick (1”-1 ½”) felt pads can be easily cut/torn into thinner pads, as the material is put together in layers.
Some horses show no preference between the foam/rubber pads and synthetic wool felt. For these, I tend to use the felt, as it is cheaper and more durable (always a good combination).
Thick leather is another durable pad choice. Go to a leather shop and buy tanned, full thickness cowhide. These pads offer less shock absorption so may not be the best choice for most thin-soled horses. But for sound horses that you simply want to provide more load distribution, leather is a great choice. I also prefer leather when I need to unload an area of the sole by cutting a relief hole in the insole. This comes up with surgery sites on the bottom of the foot, and with “sole penetrations” or other exposure of the solar corium.
Regardless of the material selected, you will need to cut it to shape. With Easyboot Gloves, I place the boot on the pad material with ½” of boot heel tread hanging off the edge of the pad. Then, using a Sharpie, I trace the boot outline onto the pad. I cut the pad with large shears or a razor knife, following the inside of my mark, leaving the mark and 1/8” of extra material on the unused portion of the pad. The desired end result is a pad that fits the inside of the boot well, with no wiggle room, and no lapping up onto the sides in any area.
Power Straps
These are stretchy rubber additions to the top of the Glove boot, available as add-ons from EasyCare. They are very handy for eliminating boot fit/performance issues, but they do make boot application more difficult for the average horse owner. When I first started using the Gloves, I knew nothing about heat fitting them and found I needed Power Straps on about 20% of front feet and 80% of hind feet. As I got better at heat-fitting, I use about two sets per year.
Their best use may be for economy. When you fit Gloves to a flared or rotated foot and then succeed in growing in better-connected walls, the foot size is generally smaller. This means the boot fit will have become loose and sloppy. The correct thing to do at this point is fit a new set in a smaller size but adding the Power Straps can be a cheap alternative that extends the life of the old boot.
Power Straps come with cut and punch marks labeled for each boot size. I have found that, rather than using these marks literally, I do better thinking my way through it and punching the holes where I think they need to be for the individual fitting needs.
Add-On Buckles
As an extension of the Power Strap idea, you can add buckles to the boots to gain even more adjustment. The buckles in the picture below are replacement buckles for O’Neal motorcycle boots I ordered from Amazon. Of course this eliminates some of the compact nature I love about the Gloves, but the result is still more compact than most types of boots.
Drainage Holes
In other models of boots, I usually drill drainage holes in the sole to quickly drain the boots after creek crossings. Due to the close fit of Gloves, particularly if insoles are being used, I find there is no need to do this – there is not really any room for sloshing water in the well-fitted Glove. But opinions (and fitting) vary, so if you feel the need to drill drain holes in your boots, there are certainly no problems with it. I generally like to use a ½” drill bit and place multiple holes in the tread over any open areas inside the boot. This hole size seems to be a good compromise – large enough to resist clogging and small enough to minimize the entry of pebbles.
Trim Cycle
By nature, Easyboot Gloves are probably more sensitive to a tight trim cycle than other models. This works to some horses’ advantage because boots have been used by many owners as a tool to allow neglect.
The boots should be fitted to a freshly trimmed foot. There is generally enough stretch in the Glove shells to accommodate a six-week trim cycle if there is minimal wall flaring on the hoof. But for horses with significant wall flares, the foot gets much larger in circumference during the trim cycle. By six weeks, you usually will not be able to get the Glove on. These horses will need a shorter trim cycle until most of the flaring is successfully grown out – but again, this is a good idea, anyway. It is worth noting, though, that the bulkier types of boots with buckles and overlapping layers of materials will be more accommodating to long trim cycles on flared hooves. The Gloves aren’t for everyone.
Modifications to Tread
Breakover Adjustment
The stock bevel built into the toe of the Glove is generally just right for horses with perfect wall attachment at the toe except that since horses need to turn, I feel that same shape should continue from a 10:00 to 2:00 position around the toe. This modification, I do to almost every pair I fit. I use a brand new Heller Legend hoof rasp that has never trimmed a foot for this (and most other modifications to the boot soles). Many types of sanders and grinders work well, too – your choice.
In horses with separation of the toe wall from the coffin bone, I generally accommodate most of the needed breakover adjustment with heat-fitting of the boot’s toe, but an additional inch of breakover change can be trimmed into the boot sole as well. This is handy for joint, muscular and other problems with locomotion as well.
At 7:00, I have added a typical heel rocker I like for chronic toe walkers, hoof capsule rotations, and some club feet. This shape and size can vary as needed. Center, is a common vent (discussed below) I do, only on Glue-Ons – not Gloves. This is a size #1.5, the hole was made with a 2 ¼” hole saw and drill.
Heel Rockering
There are countless reasons (I won’t go into here) that rockering of the heels can create an advantage for the horse – club feet, forging issues, chronic toe-walkers, joint problems, caudal foot pain, hoof capsule rotation to name a few. I often do this, both to bare feet and to any appliance I add to the foot, including hoof boots. The Gloves accommodate this very well.
Wedging
Occasionally, there is a therapeutic need for mediolateral or dorsopalmar wedging of the foot. If no more than 3/8” of deviation is needed, I prefer to simply remove the unwanted material from the boot tread. If more were needed (rare), farrier wedge pads (up to 3/8”-thick) can work in the Gloves.
Traction Modifications
Two types of add-on studs are available from EasyCare – a large nut/bolt type stud and smaller ice studs. I have also experimented with using a hole saw to drill out and open the bottom of the boot, leaving a narrow rim of shoe at ground level and an exposed sole. This gets great traction in muddy and most arena conditions but may have the same disadvantages of a thick metal shoe; clogging and carrying too much weight of dirt, which could limit performance and hasten fatigue.
A better modification for deep or muddy footing is to use an electric router and guide to thin the boot tread to ½” wide. Next, heat up the remaining boot sole and push it up into a dome shape (I press the boot sole onto one of my daughter’s softballs to achieve this shape. The prototype traction sole shown below was simply a computer duplication of a Glove shell I modified in this fashion.
The idea (much like a bare foot) is that the tread will clean out with every stride (spray with WD-40 or Pam for better results). I believe that these get better traction on mud, wet grass, arena surfaces, tracks, etc. than cleat-type treads or a metal perimeter shoe because of this resistance to clogging. An additional advantage from a performance standpoint is not carrying the added weight of the dirt/mud.
This boot will, of course, wear out faster on hard terrain but as with human athletic cleats vs. track shoes, I don’t think it will ever be possible to optimize turf traction with the same tread pattern that is perfect for road work. You’ll need to own both.
Boot Turnout Done Right
The Gloves are designed and intended for riding and other work, with the assumption that the boots will be removed when the horse is turned out. In spite of that fact, after trying countless options, I have found Gloves are my favorite turnout option for horses that are temporarily lame in their own turnout environment. Boot turnout is no picnic for the horse owner – there is work involved – but, in my experience, padded boots tend to provide more pain relief and quicker healing than any other shoeing option. If increased movement and a lack of compensative movement are achieved while simultaneously “doing no harm,” the result is healthier growth of every part of the foot. So boot turnout tends to be the quickest path to feet that are healthy enough to be comfortable barefoot in their own turnout environment.
This is most critical with laminitis cases. Only in a padded boot (or sometimes bare on the most perfect terrain) can you hope to get away with unloading the walls (and thus the laminae), carrying the load on the sole while healthy laminae are re-grown. This is because only boots offer a full release of pressure to the sole when the hoof is in flight.
The primary reason I like the Gloves best for turnout is that with heat-fitting, I can adjust breakover to the correct area on horses with flared or rotated walls – a key feature of most horses who are unsound at turnout. For caudal foot pain cases, assorted pads can be tried in the boots to achieve flat or heel-first impacts – the key secret to success with these cases. The Glove tread readily accepts modification, as discussed above, often critical to rehab cases. In my experience, a well-fitted Glove is less likely to cause rubbing of the bulbs or hide than any other boot I’ve used. All this and more can be done in a lightweight, very compact package, which also very important to me.
Turnout is hard on boots. Constant exposure to UV rays break down the nylon and plastics. Generally the same boot that might last an endurance rider 450 miles (or the average trail rider five years) will be destroyed by 2-3 months of turnout. The Gloves are no different except the only part that gets destroyed is the gaiter. Replacing the gaiter is much cheaper than buying a whole boot.
Note: Gaiter life is greatly extended by wrapping the gaiter with Vet Wrap (or other tape) when using the Gloves as turnout boots. It blocks UV rays, and helps prevent horses from nibbling on the Velcro closures.
The Gloves do also have weaknesses as turnout boots, compared to other models. Some cases will need thicker padding than the Glove can accommodate. I use ½”-thick pads in Gloves on lame (lower performance) horses, and it works well. But if you need thicker padding, you will need to select a different boot model.
Another issue already discussed is that with the Gloves, you are more likely to need 2-3 boot sizes as you grow out a 20+ degree rotation than if you were using a boot with buckles and layers of overlapping material. But since you generally can’t get breakover right on a rotated foot with those other types of boots, I feel you are much more likely to grow out a rotation if you use heat-fitted Gloves. The extra money is well-spent.
Regardless of the boot you choose for turnout, the primary problem is the rotten “funk” that quickly builds up inside the boot. This can complicate infections in the white line and frog. It can also get in the way of growing a healthy sole, one of the key features of a horse that can be sound for barefoot turnout. To eliminate these problems, the boot must be removed and washed daily. During this time, clean the horse’s feet and place him in a dry area suitable for whatever problem he has (deep shavings, a deep bed of pea rock, etc.).
During this time, inspect the bulbs and legs for rubbing. If this occurs, it is probably because the boot is too tight at the heels (jamming), or too loose (twisting/movement is occurring). Re-fit your boots and/or bandage or use a man’s tube sock on the horse prior to booting.
After – ideally – two hours of drying time, powder the inside of the boot with Gold Bond Medicated Powder (available from most pharmacies) and replace the boots. Re-wrap the gaiters with Vet Wrap (or other tape).
Yep, this is a lot of work for the horse owner. But for many problems, particularly laminitis and caudal foot pain/navicular syndrome it works better and is way-cheaper than any shoeing option I know of. I expect/demand horse owners with a horse with the above problems to give me 2-3 months of good boot turnout. During this time, my goal is comfortable, non-compensative barefoot turnout. If I cannot achieve this, I let the horse owner off the hook and seek other options.
Some problems are permanent. Others may take years to fix. This is when I reach for glue-on shoes. The healing rate is slower, compared to booting, but the daily maintenance by the owner is more reasonable for the “long haul.”
Please stay tuned for EasyCare’s July newsletter for Part II of Pete Ramey’s “Modifications of Easyboot Gloves and Glue-On Shells“. Don’t miss out! Subscribe to EasyCare’s newsletter today.


