


Submitted by Pete Ramey
Glove Glue-On Shells
The Industry’s Shift to Synthetic Horseshoes
In my opinion, the increasing popularity of synthetic shoes – both for rehab and for high performance – is a very good step in the right direction. During the time that metal was the only material we had that would hold up under a horse, metal made a lot of sense as a horseshoe material. But these days we have a wide array of materials that will do the job, and most of them are much better for energy dissipation and shock absorption. These materials are also more flexible, which can allow the foot to function more normally, perhaps leading to increased health of internal structures when compared to more rigid shoes.
I do worry that synthetic shoes will become just another thing that people leave on horses’ feet 365 days a year. Healthier than steel, perhaps, but still degrading the foot with their constant presence. I use these tools in my everyday work, but for most situations I remain a “barefoot and boot man,” as I think this combination yields the best hoof health in a majority of situations.
My Love Affair with the Glove Shells
There are times, though, that long-term or even permanent hoof protection is needed. For these horses, I usually turn to the Glove Glue-On Shells, simply a Glove without the gaiter (instead of other synthetic shoe models) for several very specific reasons:
- All of the glue bond is on the side wall, instead of on the bottom of the wall. This frees me up to unload areas of separated walls, making these shoes ideal for growing out hoof capsule rotation, toe flaring, and quarter flares (and thus wall cracks).
- Almost as well as a hoof boot, if applied properly, they can allow total release of pressure to the sole during hoof flight. This allows you to get away with more sole pressure/support than any other fixed shoeing method I have seen, heard of, or tried.
- There is no need to trim the foot “flat” in preparation for shoeing. The horse’s foot, when viewed from the side, is naturally arch-shaped, mirroring its internal structures. The only ways to level this arch for shoe prep are to, 1) thin the sole at the toe, 2) thin the sole at the heels, 3) leave the quarter walls too long, or some combination of those three. I can’t abide any of those, as each causes damage. Note: When floating the quarters above the shoe floor, be careful not to let glue run beneath the wall and harden under the sole.
- The glue bond area is 3-5 times larger than typical glue-on shoes. There is also no need to prep or protect the prep of the ground surface of the foot. For beginners, this makes it easier to succeed with them. For seasoned veterans, this makes the bond as close to bombproof as a shoe can get.
- I can pad in them! Most permanent shoe modifications accommodate padding or impression material under the arch of the sole, but not under the wall or the outer periphery of sole. This little trick is a true life-saver for thin-soled, splat-footed horses.
- Using heat-fitting, this shoe can easily adapt to any almost any hoof shape, and be adapted to any breakover or heel support needs.
- Economics. I can stock only this shell and, by trimming it down to shape, duplicate a wide array of products. If I want an Easyshoe, a Flip-Flop, a lower cuff, a direct glue shoe with no cuff, M/L or D/P wedge, better traction, heels in, heels out, open sole, closed sole, frog support… I can make one by removing unwanted material from this single product. This helps maximize precious storage space in my truck and, of course, dramatically cuts the expense of carrying extra stock.
Heat-Fitting
It is equally important to achieve a close fit with the Glue-Ons as it is with the Gloves. We have the same breakover and heel support needs. Large gaps between the wall and shoe will be difficult to fill with glue, and tight areas may push the shoe out of place before (or after) the glue dries.
Better fit can be achieved with the Glue-Ons than the Gloves when large quarter flares are present since the gaiter is not in the way of quarter fitting. During the heating process, you will find that it is better to hold the shell with something besides your hand, particularly if you have opened the sole (discussed below). I use my shoe pull-offs or crease nail pullers.
As an end result, you want a snug but relaxed fit with little-to-no air space, and no pressure attempting to push the shoe out of place. Prior to gluing, you should be able to put it on the foot with no glue, walk the horse around on concrete, and it should stay in place.
Other Modifications
All of the modifications I discussed in Part I with the Glove boots can also be done to the Glue-On Shells. Below are additional options I use only when gluing.
Venting the Back of the Shoe
Gluing allows you to cut out the heel section of the boot completely. I almost always do this as it allows the foot to breathe, keeping the back half of the foot relatively free of the black, foul funk. I tend to do this simply with my pocket knife, and then I finish by rounding the top of the cuff with my nippers or shears.
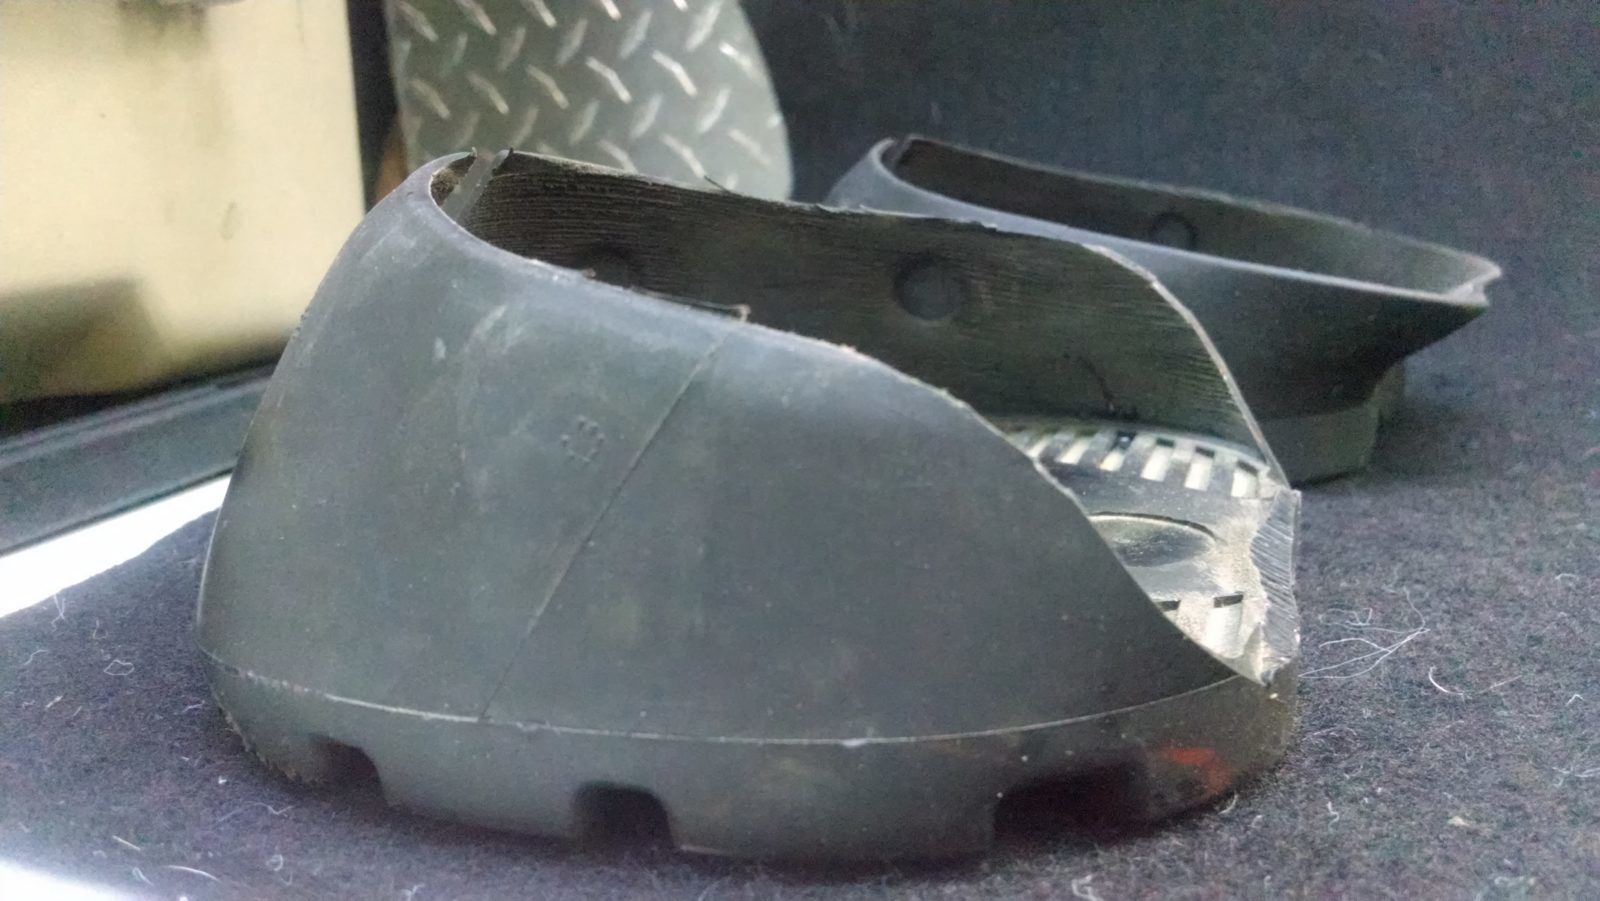
Opened heel of Glove shell, done with knife and nippers. I’m doing this to 90-something % of my glue-on shells.
Venting the Bottom of the Shoe
If there is adequate sole and frog in the center of the foot and if I don’t perceive a need to use impression material or padding, I often vent the bottom of the shoe. Using a jigsaw or Dremel, you can follow the contour of the shoe tread, mimicking the frog support and look of an EasyShoe. The material is strong and difficult to cut. Most tools actually burn their way through it, rather than cutting, and it can be a long process.
So in most cases, I simply use a drill and hole saw (thank you Leslie Carrig!), usually 2 ¼” diameter, occasionally larger, to vent the bottom of the foot. This takes seconds to do, with no burning or clogging, though the end result may not look as cool as other designs, the horses never notice. As with almost any open-bottom shoe, there is some risk of a stone lodging between the shoe and the sole, causing problems. But the access to air can be worth the risk, particularly if the owner routinely picks and checks the area.
Pads and Impression Material
All of the padding methods discussed for the Glove boots will work with the Glue-On version, plus several additional options — Dental Impression Material (DIM), pour-in pads, and Sikaflex 227 adhesive, to name a few. Generally, when using any type of pad, I leave the shoe’s stock sole intact (forgoing the sole vent). I also fill the collateral sulci and cover the sole with a thin layer of Artimud to keep infection at bay.
Prep and Glue
Gluing instruction is best done in person or at least via DVDs or YouTube (start here) – not in writing – but here is my basic protocol in a nutshell, and in a very specific order:
- Trim the feet, clean out any infected areas in the white line or frogs, wire brush debris from the walls and bottom of the foot. This, and the other steps are each done to all four (or two) feet that are being glued in sequence, rather than doing each foot start-to-finish. This saves time.
- Heat-fit and do all shoe modifications. If using DIM or a felt pad, it is prepared at this point. If using a pour-in pad, decide if you need a hole or holes in the shoe to inject the pad.
- Sand all the gluing surface of the sidewall, yielding a rough finish. I cut 50 grit belt sander belts into small squares and do it by hand, or more recently, use a cordless drill buffer/sander. I then use the rough corner of my rasp to add fine grooves to the gluing surface. Take care to prep all the way to the back of the heels. This area can be hard to reach, easy to forget, and is the most critical area of glue bond.
- With a small hand-held butane torch, I heat the outer wall for 1 or 2 seconds in each individual spot, moving the torch around very quickly while avoiding melting the hair at the coronet. Most of this, I do with the foot on the ground, but be sure to pick up the foot and prep the heels. I do the same to the inside of the shoe’s gluing area. This step eliminates dust, oils, and moisture, and is critical to success. After this step, take great care not to re-contaminate the glue surfaces of the hoof and shoe. Arm sweat, oils from impression materials and bacterial treatments are the most common culprits, as well as the grubby little hands of curious onlookers and well-meaning horse owners with a bottle of fly spray in hand (yep, it happened to me).
- Using a painter’s digital moisture meter, verify that all parts of the hoof’s gluing surface read 0.0% moisture. If not, repeat step #4. If a horse just came in from dry stall shavings or a dry pasture, one lap with the torch will usually do the trick. If the horse just came in from the rain, it may require three or more laps. Resist the temptation to heat longer as this could harm the horse. Instead, heat more times. Be patient – this is the most important step, particularly if you live in a damp climate.
- Glue. Keep it warm in winter, cool in summer. I like to use the guns and mixing tips – personal preference. Sometimes I use the acrylic, EasyShoe Bond Fast Set (Equilox, Equibond – all the same, with different labels) because it may be better glue for wet environments, and sometimes I use the urethane Vettec Adhere because it is less noxious and may do less damage to the walls. Adhere is also more user-friendly, and thus may be easier for beginners to succeed with.
- Purge the glue before installing the tip. For Adhere, be sure equal amounts of both agents are flowing freely. For EasyShoe Bond Fast Set, be sure the (white) bonding agent is flowing constantly, about 1/10th the volume of the pigmented agent. If so, wipe the glue from the end of the tube, being careful not to mix the agents, and apply the mixing tip.
- If using DIM, place it on the foot. If using felt (or other) pads, place them in the shoes.
- Purge a grape-sized ball of glue onto the ground or paper towel, then apply the glue to the shoe. I avoid the sole, the ground surface of the wall, and the lower ½” of the cuff. The concern here is getting a glob of glue on the sole, which will then act as a stone in the shoe. To the rest of the cuff, I apply the glue liberally with a continuous ¼”-thick bead covering most of the gluing surface by the time I am done. In warm weather, I then put the shoe on immediately. In cold weather, I may stall for a bit, waiting for the glue to begin to cure. I repeatedly touch the glue with my gloved finger – at first the glue will attach a small “string” as I pull my finger away. As the glue starts to cure, this will not occur, and it is time to apply the shoe. As you do this, be careful not to drag glue from the sidewall onto the sole.
- Wait. For some applications, I want to cure the glue while I am holding up the foot (less sole pressure, less compression of pads – I generally do this on thin-soled horses). On other applications, I want to cure the glue with the foot on the ground (easier for lame or impatient horses; may yield a more snug “performance fit.”). If the shoe is to be cured in the air, put the shoe on, put the foot down on the ground, have an assistant pick up the off foot, then quickly put it back down (this spreads any glue that might have ended up on the sole). Pick up the foot you are gluing, check shoe placement, wipe off any excess glue, then hold the foot up until the glue dries. If the glue is to be cured with the foot on the ground, place the shoe, have your assistant pick up the off foot, and then watch the glued foot carefully as the glue dries. At some point partway through the cure, I switch places with the assistant, as I will want to be the one holding the foot during the latter (and more trying) minutes of the cure.
- Repeat for the other feet. You will need to clean, purge, and apply a new mixing tip for each shoe.
- Go around with a hoof pick and check the shoe heels to be sure they are bonded. If not, attach a new mixing tip and re-glue these areas. At this point, you can also seal the tops of the shoe cuff with a thin bead of glue. If you are slick, you can get all this done to all 4 feet with one mixing tip.
- If you are using pour-in pads, inject them now. Decide whether you want a lot of sole pressure, a little, or none. If you completely cure the pad while you are holding the foot off the ground, there will be a lot of support/pressure. If you put the foot down to let the pad cure, there will be none. It varies case-by-case, but I tend to do something in-between.
- When all the glues are cured, watch the horse move. Make final adjustments to breakover and heel rockers, if needed, based on movement.
Removal
After 5-6 weeks, Vettec Adhere will become brittle enough that shoe salvage is not terribly difficult (though it is still cheaper to buy a new shoe than it is to pay me to clean an old one up for you). I take a ¼” flathead screwdriver and work it between the shoe and the hoof, separating the bond.
With EasyShoe Glue (Equilox, Equibond…) at 5-6 weeks, the glue will not be brittle – the screwdriver method rarely works. Instead, using my hoof knife, I cut ½”-long slits in the top of the cuff, dividing the cuff into 6 sections around the circumference of the foot. I then use my shoe pull-offs to peel and rip each of the sections down and off the hoof wall individually.
Tape-On Application
A hybrid between the on-off hoof boot and a glue-on application is the tape-on boot/shoe. Many people trail ride in this setup, and I use it for rehab cases when I need to cover the foot for 24-48 hours and then gain access.
Warning: Results of this vary wildly. If a horse steps on his own shoe, they will pull right off. But I have also seen them stay on for a week and heard of them staying on even longer. I think it really depends on the way the horse moves and perhaps the environment. I have found that I can count on them for 48 hours as well as about anything – so this is how I use them.
If a horse absolutely must have 24/7 protection, use a boot or a glue-on instead. I like to say, “Tape-ons are for when you kind-of need a shoe and only need it for a short period of time.” All that said, this is still a very commonly useful tool, and has the distinct advantage that you can keep re-using the same shell over and over, often for years to come. This can also be the only option (for turnout or riding) when the bulbs or coronet has been injured and permanent shoeing is not desired. This method also works for use similar to a hospital plate when daily access is needed to dress a wound or surgery site.
This method is ideal for post-trim tenderness. A conscientious trimmer (with a stock of glue-on shells) who inadvertently causes post-trim soreness, can do a tape-on application to cover the foot for a few days, then pick up the boots at the next visit, clean them up and sell them to a gluing client. All it costs is the purchase of the tape and the time to clean up the boot.
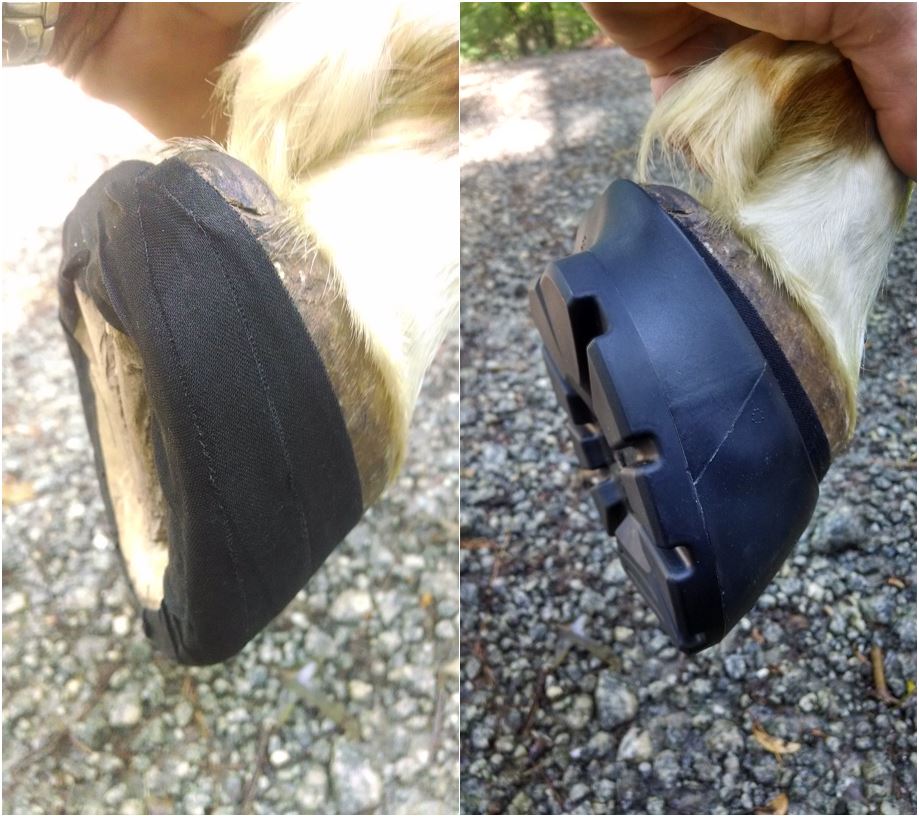
Mueller Athletic Tape Application. Used alone with Glove Glue-On shells or as extra insurance with Glove hoof boots.
Mueller Athletic Tape
Note: Several years ago, I bought two cases of Mueller Athletic Tape, which I am still using. Apparently, it has since changed, and the material is now thinner (thanks, Amy Diehl), so these instructions may warrant some experimentation with the newer version of tape. I will update as I learn more. And, no, I will not sell you any of my tape.
Here is my method:
- Heat-fit a Glove shell – and strive for perfection. Do not cut the back out of it or open the sole for this method – just use a stock shell. As always, the better the fit, the better this will work. You want to end up with no excessively tight spots and as little air space as possible. The shoe should be difficult to pull off, once applied. Be sure the boot is clean – free of dirt and moisture.
- No additional prep to the foot is required; just trim normally.
- Wrap the foot with Mueller Athletic Tape as if you were applying a hoof cast. I generally use 3-4 rounds/laps of tape, wrapping so that I cover all of the side wall that the boot shell will cover and also lapping under the wall and slightly onto the sole.
- Drive the boot shell onto the foot with a rubber mallet (or for trail use, a big stick). For the first 30 minutes, the extra friction provided by the tape will make this shoe very difficult to remove. After 30 minutes, the heat and pressure will have caused the tape’s own glue to wick through the fabric and there will be a pretty decent glue bond. During the first 24 hours, it is almost as hard to get off as it would be if it were glued with hoof adhesive.
- The bond seems to disappear within 48 hours. I think dust simply works its way in and absorbs into the glue. I believe that when I (and others) have seen these stay on longer, it was simply because of good fit, the added friction, and a horse that never interferes or trips. Either way, removal after 36 hours is not an issue – you can generally pull them off by hand.
Mueller Athletic Tape in Gloves
The above wrapping method is even more useful as “Glove boot first aid.” If you are using Glove boots, carry a roll of Mueller Tape in your trail pack; it doubles as first aid tape, so shouldn’t take up extra precious space. If you rip a gaiter on the trail (or develop any other boot fit/performance issue) you can add the tape to the foot, knock the boot on with a stick, and ride on for the rest of the trip without a gaiter.
I even had one client who was using a #2 Glove when her friend threw a #0 horseshoe. They kept wrapping tape around the #0 foot until the #2 Glove fit and got the horse off the trail without further incident. My client discovered, at the same time, that her horse no longer needed boots for that particular trail anyway. Now, this is not a recommended application by any stretch of the imagination, but it did work.
Smoothing Boot Fit Problems
I like for my booting clients to have a roll on hand in case booting issues pop up mid-cycle. This is particularly common when I am in the process of growing out hoof capsule rotation or wall flares. The boot fit will get sloppy over time. I do try to adjust for this at routine visits, but sometimes I misjudge. Hopefully, when I arrive for my scheduled visit, I can de-bug the boot fit, but having a way to keep my clients riding saves me some unscheduled trips.
I recall two instances where I had to use the tape application with the Gloves as a permanent fix. I didn’t like it, but it was the best I could do. Both were on the hind feet of horses with hip problems that rotated their foot on the ground under load. After several boot-fitting fails, I left both clients applying one wrap of tape prior to booting the hind feet. Sloppy, yes, but better than nothing, I suppose.
Race Day
This method, combined with adding Vet Wrap to the gaiter is how to make a bombproof Glove application. I don’t like to see clients train this way. I want to work through any booting bugs during normal rides. But on race day, show day, or that big group trail ride – that day when you want to be absolutely sure you don’t have any problems, it is worth the extra 3 minutes to put Mueller Tape on the foot, boot, then wrap the gaiter with Vet Wrap. Optionally, an added bell boot seals the deal.
And the List Goes On…
That’s the best thing about these two platforms (the Glove and Glove Shell). Your own imagination is the limit. While every boot and shoe can be modified to some extent, none other lends itself to so much possibility. In the past, I had to haul around a wide variety of options. Now, I find that I can get by with a full stock of only these two products – well – except that we do need them in larger sizes… and with some different tread options.
For a complete article in PDF format, please follow this link to be redirected to Pete Ramey’s website: http://www.hoofrehab.com/Glove%20Mods.pdf


