#4: A Good Fit; A Bad Fit – How to Tell if the Boot Really Fits
You can’t fudge the fitting process and still expect the boots to work for you. If you don’t go through a few detailed steps; chances are the boots won’t work for you.
I can remember attending an endurance ride in my pre-EasyCare days a few years ago with a couple of Original Easyboots in my pack that I had bought for a previous horse. I had no idea if they would fit my horse as a spare tire. But they were there in case I needed them. I was lucky not to need them, because they would almost certainly not have worked for that horse.
To get the right fit, you must first measure the feet. If you intend to purchase boots for all four feet, then you must measure all four feet. Measuring hooves is not an art, and don’t let anyone tell you otherwise. It is a system, or a process, and you can do it yourself. Really.
A. How To Measure
1. Always measure a freshly trimmed hoof. Don’t wait more than one week between the trim and measuring. EasyCare boots require two measurements: width and length.
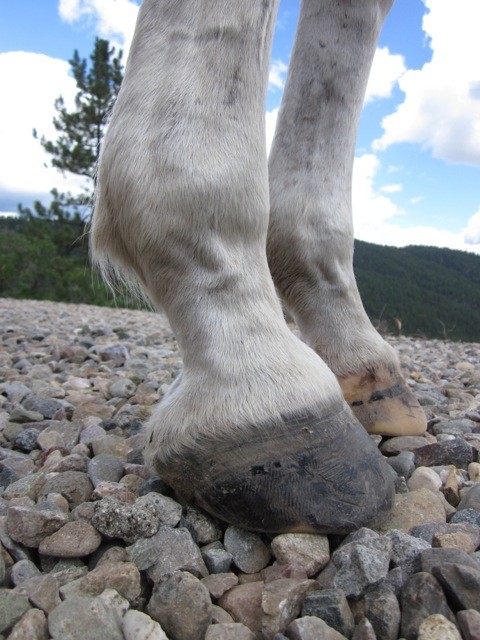
Today’s model is Ripper. He was trimmed one week previously. Note the short toe and short heel (and some glue residue from his completion of the Big Horn 100 two weeks previously). If the hoof health and living conditions allow it, this is the kind of barefoot trim you should strive for. As well as being healthy, this general hoof shape will work best for boots.
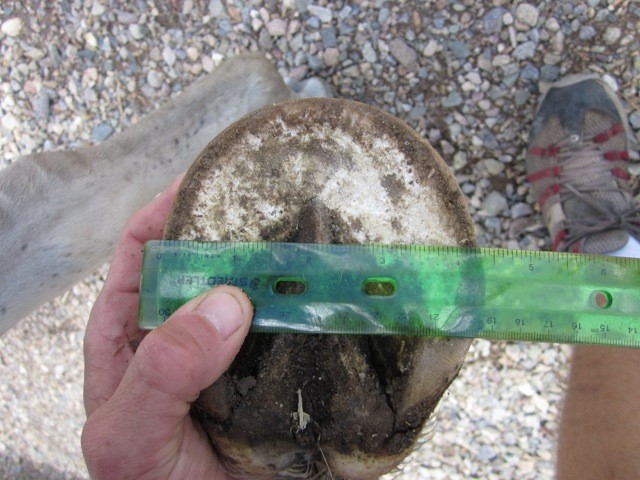 Above: measuring width the correct way: at the widest part of the foot.
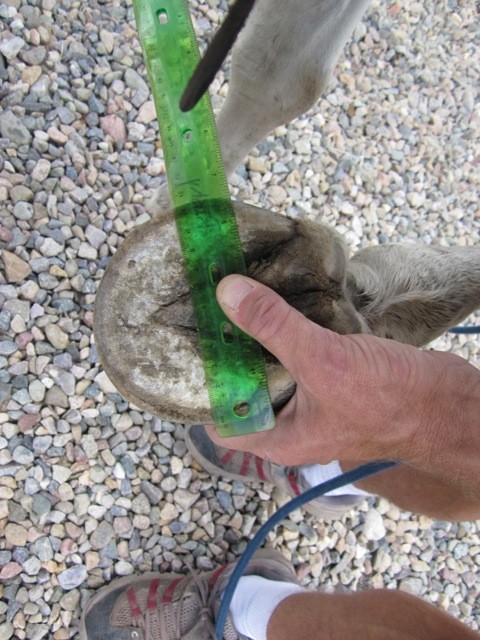
Above: measuring width incorrectly – make sure the ruler is not crooked.
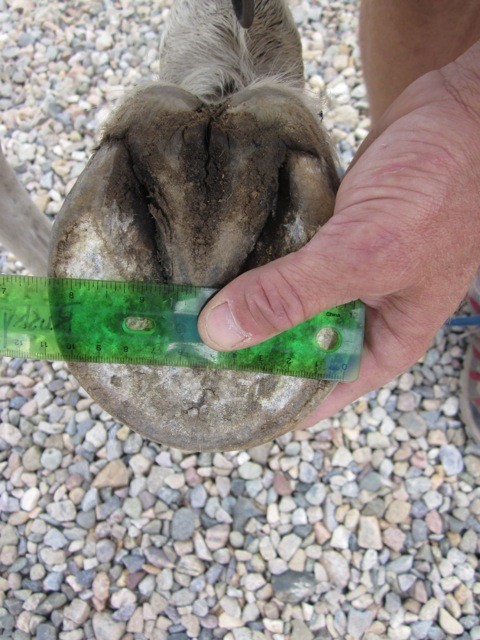
Above: another incorrect measurement of width: this is not the widest part of the foot.
1.2 Length: This may be slightly more challenging than the width measurement. Find the part of the hoof where the hoof wall turns around and becomes bar. Place the end of the ruler or tape measure there, and then slide it back to the center of the foot: you want to measure from the buttress to the very longest part of the toe – perpendicular to the heel. The buttress line is the farthest weight bearing point of the heel where the hoof wall ends. Do not include the heel bulbs in the measurement.
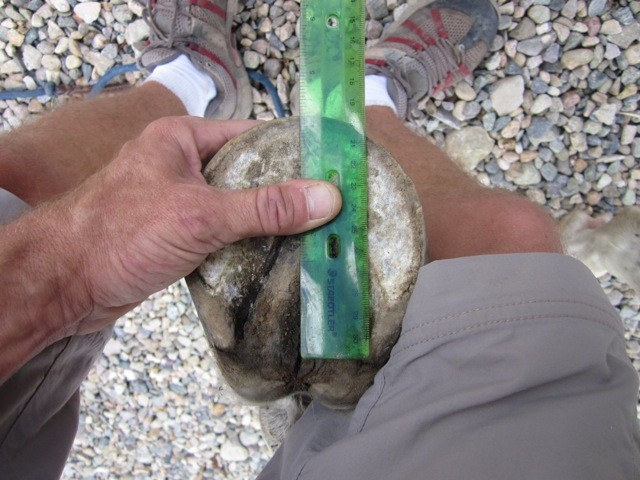
Above: note the ruler is placed at the heel buttress.
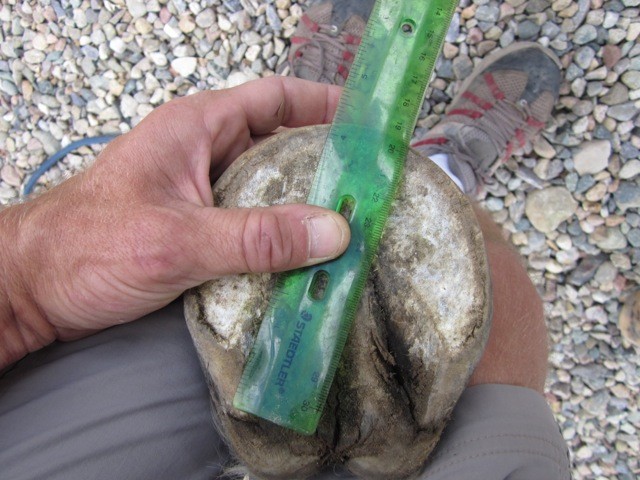
Above: this length measurement will be incorrect because it is not perpendicular to heel.
2. Using a paper and pencil, make note of each of the measurements. Tracing the foot on a paper will not help!
B. Boot Application (Putting on the Boots)
Compare your measurements with the appropriate size chart. Ideally, the length and width measurements should fit into the same size on the chart. If you intend to purchase a set of Easyboot Gloves, we recommend that you order a Fit Kit.
A Fit Kit provides you with three boot shells to try on your horse. We added the Fit Kit because using a two-dimensional measuring system on a three-dimensional hoof capsule leaves room for error. Think of the Fit Kit as an insurance policy to ensure you purchase the correct size and shape boots for your particular horse.
Once you receive the Fit Kit, put on each of the shells and see how they work with each one of the hooves you intend to boot.
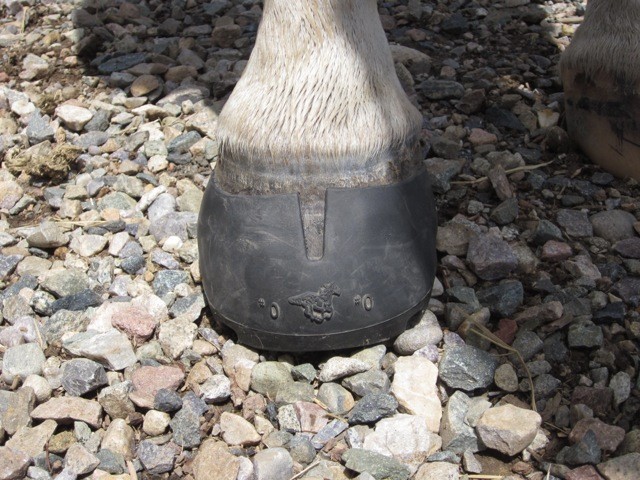
Above: this is the kind of fit you should strive for. Note the ‘v’ at the front in spread apart, and that the top of the boot shell is flush with the hoof wall and shows no gapping.
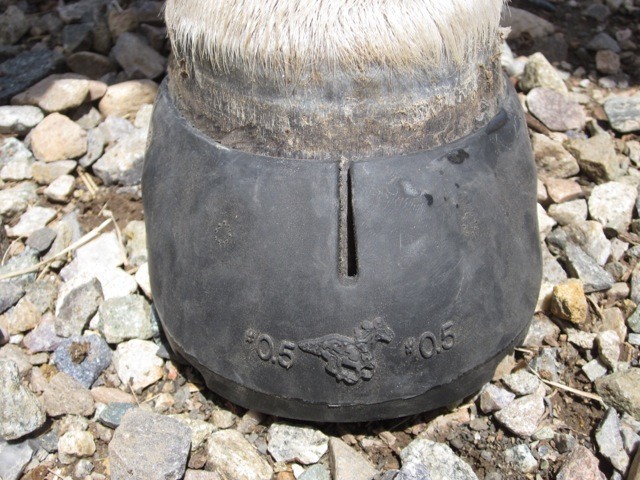
Above: this boot shell is too large for this hoof. The ‘v’ is not spread and there is gapping between the boot shell and the hoof wall.
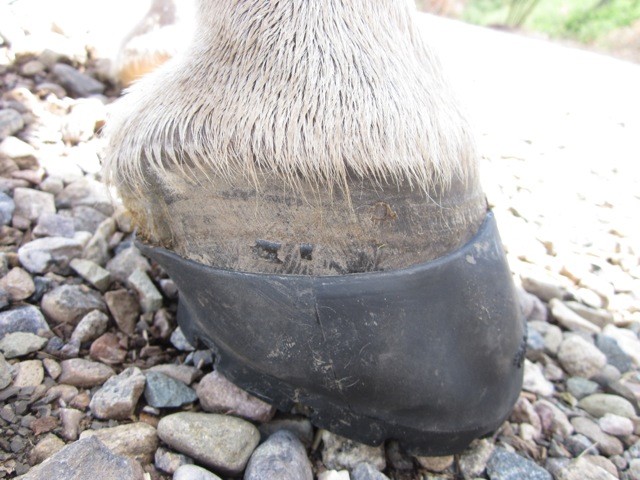
Above: this boot shell is too small. Note that the heel is not sitting down completely into the boot, and that there is bulging in the quarter area.
The above photos show exaggerated examples of what will not work. Look for more subtle versions of the same issues when trying on the Fit Kit.
A long toe or a long heel (or both) are the arch enemy of the Easyboot Glove.
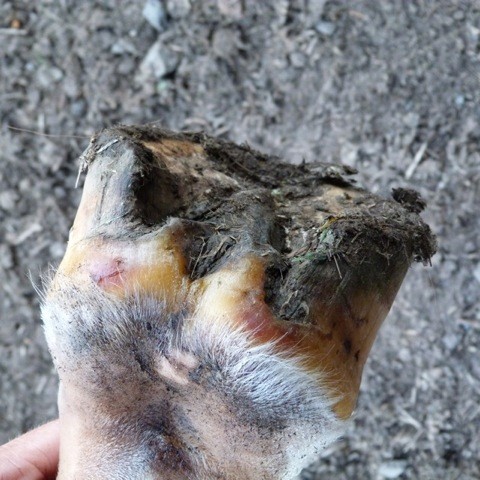
Above: an incorrect trim. Here is an example of a foot on a customer’s horse that will not do well in Gloves. Look at the length of heel on this horse – the frog is rendered completely useless and is bearing no weight at all. The additional heel height is causing pressure points against the inside of the gaiter. I would also expect rubbing on the front of the pastern with this foot.
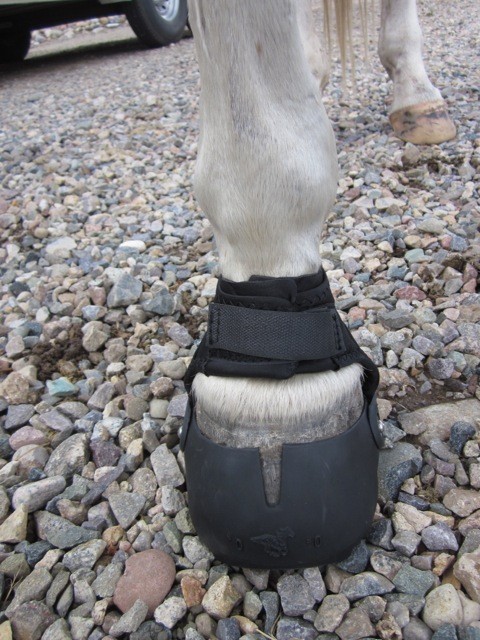 Above: This is a nice application for the Easyboot Glove. The gaiter is snug (note that it is doubled over itself on this horse). The ‘v’ is spread and there is not much distance between the top of the boot shell and the coronet band, indicating a short toe and a low heel.
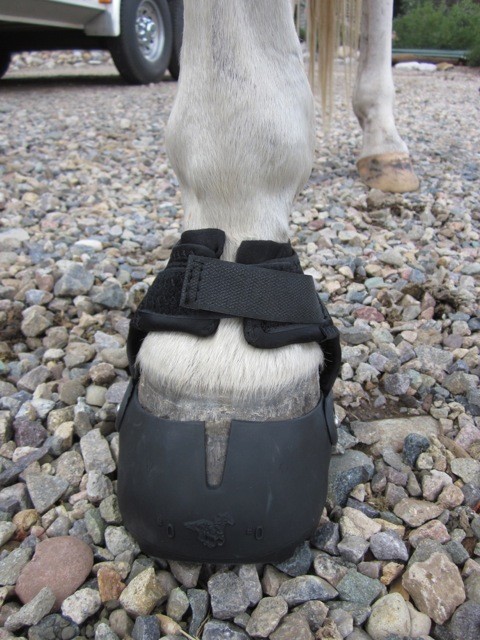
Above: the boot shell fits nicely on this hoof, but the gaiter is too loose. As well as allowing debris between the gaiter and the leg, it will increase the risk of boot loss.
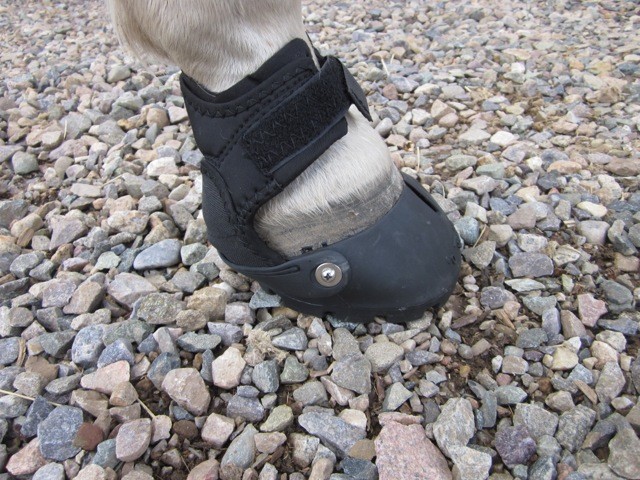
Above: this boot is too small. Note the ‘v’ at the front of the boot is not spread, and that the heel is not down into the boot shell. The result is that the gaiter cannot be done up all the way. At the very least, I would expect rubs at the pastern and the heel bulb area. I would not expect this boot to stay on at speed or with hills or water.
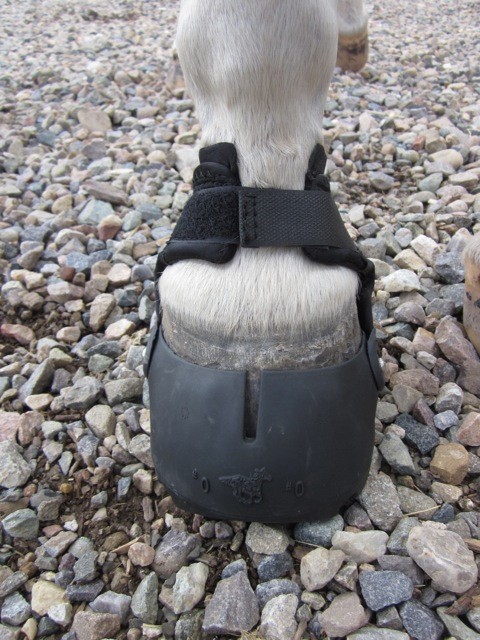
Above: this is a front view of the same boot. Because the heel is not down into the boot shell, the gaiter won’t reach properly around the pastern. This boot will fail.
Of course, not everyone wants (or will be able to) to use the Easyboot Glove or Glove Wide.
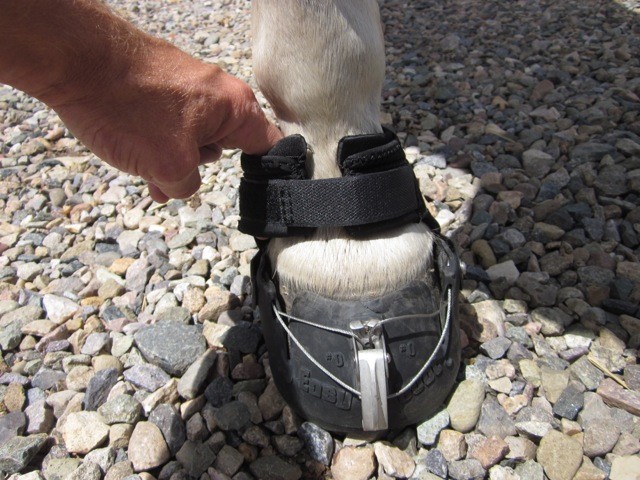
Above: this is a nice fit for the Easyboot Epic. But don’t be tempted to leave the gaiter loose.
Some customers think that leaving the gaiter slightly loose will reduce the chances of rubbing. This is incorrect: a loose gaiter allows debris between the gaiter and the pastern, and will increase the chance of rubbing. It will also increase the chance of boot loss. Make sure the gaiters are snugged up tightly. If you are new to gaitered boots, start with short rides and increase the distance and/or time in the boots over a period of weeks. Don’t go to 25-mile or 50-mile event and use the boots for the first time: you’ll almost certainly get pastern or heel rubs if you don’t acclimate the horse to the boots.
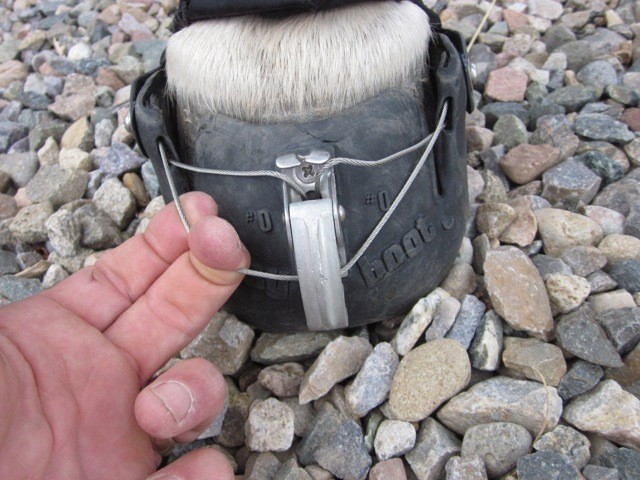
Put the wire around the collar of the buckle and increase the tension in the cable for a more dependable fit. Close the buckle with your foot if necessary, and use a hoof pick to open the buckle when your ride is finished.
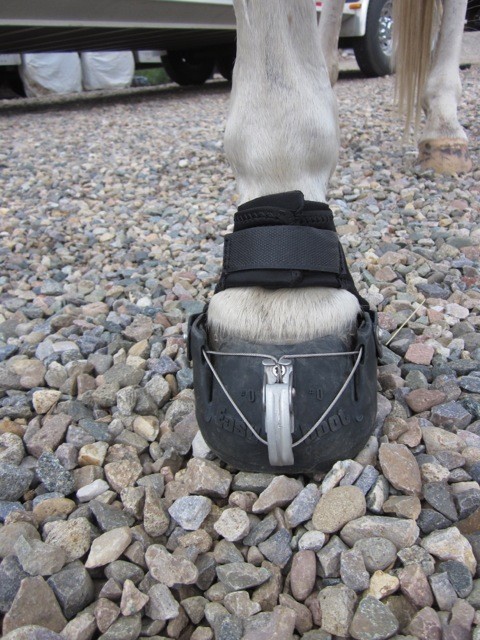
This is a nice application of the Easyboot Epic: the gaiter is snug and the cable is tight. Expect a successful ride.
If you’re not keen on regular hoof maintenance without your hoof care professional, or if you ride less than 25 miles per week, the Easyboot Trail may be for you.
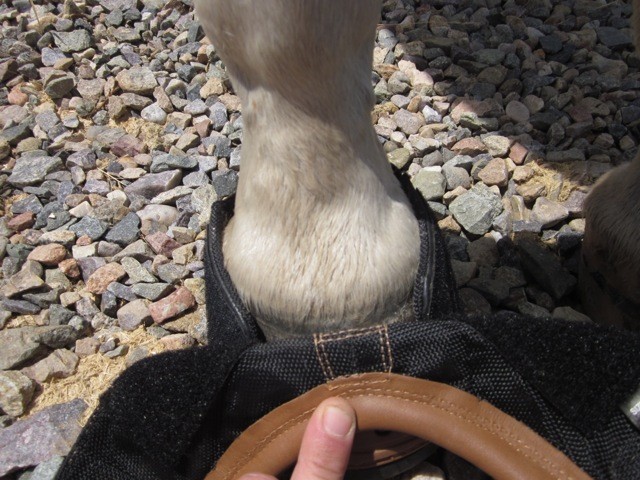
The Easyboot Trail opens up wide – it is the easiest boot to put on and remove in our product line.
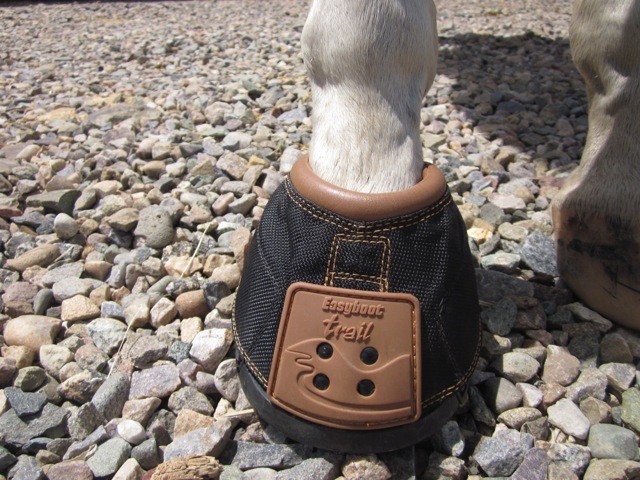 The Easyboot Trail will accommodate virtually any size or shape of hoof.
The Moral of the Story
If you start with a nicely maintained hoof; then carefully walk through the measurement instructions above, and if you carefully assess the fit of your particular boot with your particular horse, you will probably have a successful booting experience. Don’t rely on sizing charts alone. The boot on the foot will really show you if things are working well.
We’re Here to Help
If you need feedback or guidance at any point in the above process, please call us or email us photos. We’re here to help, and we want the boots to work for you. And we can probably help you overcome any particular challenge you might be experiencing.
Next week: #3: Accessorize – using booting aids: power straps, athletic tape. And rubber mallets (horror of horrors).
Kevin Myers
Director of Marketing
I am responsible for the marketing and branding of the EasyCare product line. I believe there is a great deal to be gained from the strategy of using booted protection for horses, no matter what the job you have for your equine partner.


