


Written by Heather Colket, HLC Hoofcare, LLC, Phoenixville, Pennsylvania
When you first begin your composite shoeing and gluing journey, factors such as shoe selection and sizing, prep work, glue timing, horse management, and shoe placement are the most important to focus on. It often takes several shoeings to even get one of these aspects down before you are able to start focusing on and perfecting the next factor.
This blog is written assuming that you are comfortable with all of these factors when it comes to using EasyShoes. If you’re looking to take your work to the next level and apply EasyShoes with a perfect finish, this blog is for you.
Finishing EasyShoes perfectly has several worthwhile benefits, such as increasing the longevity of the glue bond and shoe retention. It will also be more aesthetically pleasing, thereby increasing the perceived value of the shoeing to your clients. My goal for a perfect finish is a smooth transition from hoof to glue to shoe, with the glue creating an even feather around the entire cuff.
I personally use acrylic glue when I apply EasyShoes. My advice here applies to acrylic applications only as urethane glues behave very differently.
Preparing the Hoof
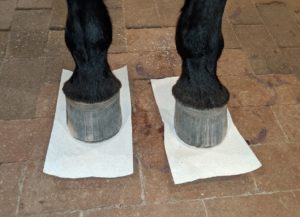 Attaining the perfect finish starts with perfect preparation. I begin by working a rasp or Hoof Buffy all over the hoof wall, from hairline to ground. I want the hoof wall to be free of dirt and other imperfections. I then proceed to scuff the quarters over the entire area where my glue feather will be. I apply antimicrobials and torch the area. I also like to apply a paper towel to the bottom of the foot at this point to keep it clean. Once all of these steps have been completed, I am ready to glue.
The Gluing Process
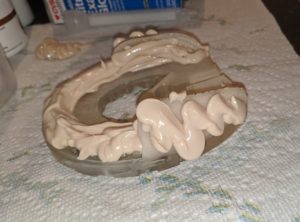 When applying glue to the shoe, I am sure to add enough extra glue so that I can create my feathers. I prefer to put this extra glue on the outside of my cuff. The key here is to wait until the glue is set up to the right consistency before placing the shoe on the foot. I want to work with toothpaste consistency, nothing thinner. Daisy Bicking’s blog post on glue timing does an excellent job explaining how the glue’s consistency will change.
Once the shoe is placed and fully seated onto the hoof, I begin to move and sculpt my glue. Using flat fingers, I start by picking up the extra glue I put on the outside of the cuff so I can form the feather. Beginning at the heel of one side, I focus on getting a solid glue attachment at the heel, then I move forward and smooth the feather into place.
I make the feather a little too large at this point because there must be enough excess 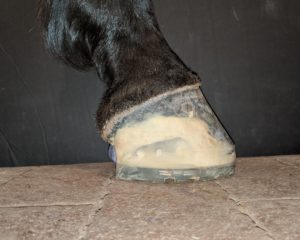 material that some can be removed during the finishing process. Once I have one feather complete, I smooth the glue through the toe area and proceed to the other side of the foot. I repeat the same process for the second feather.
Once I’m done working with the glue, I smooth my dental impression material (DIM) into the center of the shoe and out the back so that it has a neat and tidy appearance.
The Finishing Process
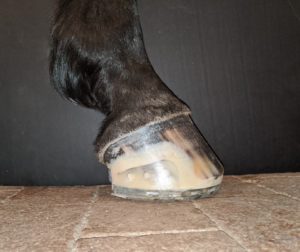
To create the final finish, I use either the rough side of my rasp or a grinder to remove the majority of the excess glue. I then switch to the Hoof Buffy or the smooth side of my rasp to smooth out the remaining glue. I make sure to hold the Hoof Buffy at a consistent angle throughout the process so that it does not leave behind small striations. I prefer to always keep it parallel to the ground.
I continue to check that all of the glue bonds are solid and don’t need to be patched while I’m working. I make sure that there is no glue left on the outside of the cuffs, that my feathers are an even size around the cuffs, and that the hoof looks as perfect and smooth as possible. At this point, I will apply super glue all over the hoof for that shiny finish.
Continuing Education
If you are interested in learning more or improving your gluing technique, Daisy Haven Farm hosts Glue and Composite Shoe Workshops where you can watch live demos, ask questions, and get hands on help while you practice gluing.
It takes a lot of practice and patience to be able to consistently produce a perfect finish. It’s worth the extra time and effort. Gluing a shoe onto a hoof is one thing, but having the finished product look like a work of art adds a whole new level to your work.


