


Written by Alicia Harlov from The Humble Hoof in South Hamilton, MA
My business is nearly all barefoot rehabilitation with the use of boots and pads. I also work with the owner on changing the horse’s diet with mineral balancing and adjusting environment as needed, and have an open discussion with their veterinarian for diagnostics and ideas. There are some cases I come across that need 24/7 protection, and the owner or environment are such that boots and pads aren’t successful. This led me to venture into the glue-on composite shoe world.
My hesitation when I first started gluing was fear of glue failure. I was hesitant to charge the prices required to cover the cost of gluing materials, just to wait around and hope that the package stayed on. I knew glue failure was usually linked to poor prep, wet environment (which is common here in Massachusetts!), or a “wiggly” horse not allowing a good glue bond. I wanted a glue on application that was almost foolproof.
When starting in hoof care I was very fortunate to have farriers and trimmers that came alongside me and taught me their tips and tricks for success. I had the opportunity to work with a good friend, June O’Brien, a lot. She was the first person to show me one of my most common glue-on applications I now use. I love it simply because of how easy it is. We have since modified it to use less glue and allow for less prep on the foot. This has made this glue-on package successful despite “less than ideal” circumstances – wet weather, dirty/dusty work area, inches of snow all around, you name it!
Another thing I love about this package is there is no glue on the hoof whatsoever, so it’s less clean up when it comes time to remove them.
I should mention, that there are some “caveats” to gluing. The glue is a bit pricey to just simply experiment, so if you haven’t done glue-on work before, I suggest that you work with a hoof care provider in your area that has experience with glue-on applications to get get familiar with the glue itself.
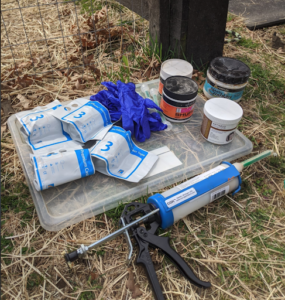
Supplies: EasyShoe Flex Lights or EasyShoe Versa Lights (coming soon!) (I used EasyShoe Flex Lights on this documented mare), Equilox/EquiBond or other acrylic glue (I prefer fast set), nitrile gloves, parchment or wax paper, Artimud or other thrush clay, Magic Cushion, DIM (Dental Impression Material), Scary Sticky Goat Tape, and casting material.
For the process:
- I have all my material laid out and ready to go before gluing. Unless it is warm out, I keep the shoes/glue/etc. in a heating pad to keep warm until I use it. If it’s very hot out, I keep my glue in a cooler so it doesn’t set up before I can even get the shoe on the foot!
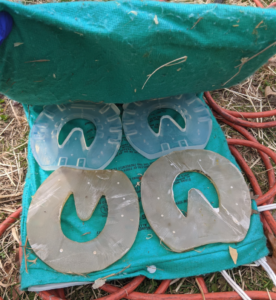
Shoes in a heating pad. We have reset the bottom pair a few times, cleaning off glue with a belt sander each time. - I am a bit more aggressive with my trim and clean up the frog a lot more when I know I will be applying this package. You don’t necessarily need to change your trim at all when doing this application, though, which is part of the beauty of it!
- After the trim, I apply Artimud over the frog, collateral grooves, and sole, although most thrush clays will work, I assume.
- With this mare pictured, I used Magic Cushion in her collateral grooves for extra thrush repellent and for some support to the caudal aspect of P3. You can also do this with DIM, but this mare does not like DIM in her collateral grooves or on her sole.
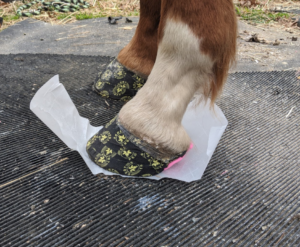
- I added extra soft (hot pink) Shu-Fill DIM from Glue-U over the very back of her heel/frog up to cover most of her heel bulbs to protect her heel bulbs from the casts rubbing them. This allows me to cast higher up the heel and heel bulb area for better retention.
- I allow the DIM to set fully weight bearing on a piece of parchment paper or wax paper, which is then removed prior to casting.
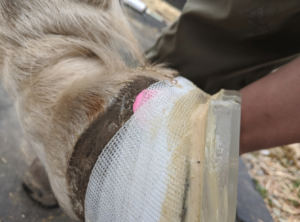
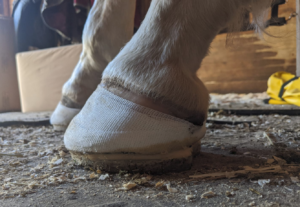
- I think part of the “secret weapon” of this package is the Scary Sticky Goat Tape. The casting material adheres better to the goat tape than it does to hoof wall in my experience, and it allows you to completely skip the glue on the dorsal wall for casting. (Note: this can be done with just a casting application and no composite shoe as well!)
I add the goat tape up the hoof to just below the hairline. That way, I know if I keep the cast just below that, the cast isn’t actually touching the hoof wall at all. - I dip the cast in water (typically cold water in summer, warmer water in winter, but this isn’t incredibly important). I use Ossur casts, but there are a lot of options. If you haven’t casted before, there are many casting videos online. For this package, I do a full sole coverage cast, and get the casting material as high on the wall as I can for better retention while staying below the hairline. The casting material can be cut after it has set to ensure it’s not too high.
- I place the freshly casted foot down on a few gym mats to allow the material to mold better into the concavity of the foot, preventing pressure points. I then pick up the other foot to fully load the casted foot, just for a few seconds, to ensure even load across the foot.
- Next, it’s time to glue! I purge enough of the glue until the color changes to know the two parts have mixed well. This is where someone familiar with glue will be really helpful. I use a good amount of glue on the shoe and make sure that it has maybe 1/2″+ of vertical height to it around the entire circumference of the glue. I “play” with the glue with my nitrile-gloved fingers until the glue has a toothpaste consistency – something Daisy Bicking taught me!
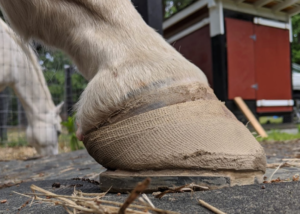
- Once the glue feels ready, I pick up the foot and apply the shoe to the cast. I set the shoe back for breakover. Remember, height adds leverage to the foot, so setting the shoe back helps to offset that. I also like to give a good amount of heel support- which for this mare, was about halfway between where her heel ends and where her hairline is. I also try to match the lateral and medial sides of the heel support with the hairline.
Showing the heel support added for this mare - I press down on the shoe until the glue comes out a bit at the sides, and I “frost” the shoe/cast with the glue. I try to smooth the glue from the shoe to the toe of the cast to form a “bevel.” With acrylic glue, you do not want the glue bond to break until it has set. Do not let the horse put its foot down and don’t let the shoe shift once you have it where you want it.
- I keep the foot in the air until the glue is warm and you cannot get a fingernail into the glue. This is important! If you set the foot down too soon, the shoe will slide right off, taking $15+ of glue with it, and you will have to start over.
- Afterwards, you can rasp the shoe back more if you want more breakover, or buffy the cast/shoe to look prettier, etc. Cut down the cast as much as you want. Once the package is on, it’s good to go! This mare pictured lives outside 24/7 and is fine to prance around her paddock immediately after gluing. This mare is a hunter, who has done walk/trot/canter/jump schooling in this package happily.
Freshly applied package
That’s the basic idea! It might seem like a lot of steps, but once done a few times it feels very simple. The hardest part of this application, in my opinion, is the removal at around 5 weeks… these packages usually stay on VERY well and can be very difficult to remove!


Awesome blog Alicia! I’m looking forward to using this application.
Is the cast still damp when you glue the shoe on?
I’ve applied it damp and didn’t seem to have issue, but now I try to wait until it’s fairly dry!
Great blog, great work! I love this application, my mare lives in this package after Keratoma Surgery 3 years ago and she is very sound in this!
Thanks so much for teaching it to me!
Comments are closed.